window xp tips

Want to be more expert in using your window xp?come here and learn my tutorial

Saturday, July 29, 2006

How To See Properties of More than One Drive

Description:
If you want to see the properties for each drive rather than just individual drives, so follow below step:

Step 1: Highlight each drive in 'My Computer'


Step 2: Right click anywhere on the highlighted box and click Properties

Step 3: The properties for each drive will be displayed in the 'properties' box

Wednesday, July 26, 2006

XP Pro or Home which is right for you?

Which edition of XP is right for you?


Microsoft Windows XP Pro contains all the features of the Home Edition, plus several more for business and advanced users. To determine if Pro is right for you, consider these points:

  1. Do you want to remotely access your computer to work on all your data and applications whilst away from your PC?
  2. Do you connect to a large PC network?
  3. Do you need to protect sensitive files?
  4. Do you need the ability to completely restore your system in the event of catastrophic failure?
  5. Would you consider yourself a 'power user'?

All the above are features of the Pro edition. Only Pro has the Remote Desktop feature, only Pro has Domains for network management, and only Pro uses Encrypting File System (EFS) for added security and has more robust options for backup and restore.

Information supplied by Microsoft


How To Stop Runtime Errors Appearing in IE

Description:

When you are surfing the web using IE, are you occasionally confronted with the following error?

'A Runtime Error has occured. Do you wish to Debug?'

Of course you can click 'No' and continue, but this can become tiresome. To prevent this message from displaying, follow these steps from within Internet Explorer.

How to Stop:


  1. Goto Start > Control Panel > Internet Options.
  2. Click Advanced tab and put a tick by the disable script debugging option.
  3. Click the Apply button and then OK to close the dialogue box.


These errors are often caused by Internet explorer's cache becoming defective. You can clear out this cache from within Internet Options On the General tab, click on Delete files. If that doesn't help, delete all the files in the folder Temporary Internet Files manually. You can usually find this folder at: C:\Windows\Temp\Temporary Internet Files.

How To System File Checker

Description:
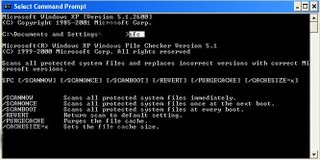
The System File Checker tool gives you the ability to scan all of the protected files to verify their versions. The System File Checker tool also checks and repopulates the %SystemRoot%\System32\Dllcache folder. If the Dllcache folder becomes damaged or unusable, you can use either the sfc /scanonce or sfc /scanboot command to repair the contents of the folder. You must be logged on as administrator or as a member of the Administrators group to run System File Checker. The average user will only be concerned with first two switches.

How to open SFC Syntax:
Goto Start > All Programs > Accessories > Command prompt and type SFC followed by one or more of the following switches:

  1. The /scannow command scans all protected system files and replaces incorrect versions with correct Microsoft versions. This command also repopulates the DLLCache folder with the most recent versions of protected files. This requires access to the Windows installation source files and also the installed Service Pack files. You are usually prompted for the location of these files during the scan operation.
  2. The /scanonce command scans all protected system files once. This command requires access to the Windows installation source files.
  3. The /scanboot command scans all protected system files every time that you start your computer. This command requires access to the Windows installation source files.
  4. The /cancel command cancels all pending scans of protected system files.
  5. The /enable command enables WFP for normal operation.
  6. The /purgecache command purges the file cache and scans all of the protected system files immediately. This command requires access to the Windows installation source files. This command is required after you run the /cachesize=x command.
  7. The /cachesize=x command sets the file cache size in megabytes (MB). This command will require a reboot followed by a /purgecache command to adjust the size of the on-disk cache.
  8. The /quiet command replaces all incorrect file versions without prompting the user.
  9. For XP and Windows 2003 systems only:The /revert command returns scan to the default setting (Note: do not scan protected files when you start the computer). The default cache size is not reset when you run this command. This command would be equivalent to the /Enable switch in Windows 2K.


Sunday, July 23, 2006

How To Hide Picture Toolbar in Internet Explorer

Description:
When you hover the mouse over large images in Internet explorer, a small toolbar pops open containing buttons that let you save or print the picture, etc. You can turn this feature off in the registry.


  1. Click start > run and type regedit > ok
  2. Go to HKEY_CURRENT_USER\Software\Policies\Microsoft
  3. Open the key named Internet Explorer, if it exists, or right-click on Microsoft key and create a new key named Internet Explorer.
  4. Inside the Internet Explorer key, open the key named PhotoSupport if it exists or right click the Internet Explorer key and create a new value named PhotoSupport.
  5. In the right-hand panel of the PhotoSupport Key, create a new value named MyPics_Hoverbar (If it doesn't already exist) by right-clicking a blank space and choosing New > DWORD Value.
  6. Double-click the MyPics_Hoverbar item and give it the value of 1. (To revert to showing the picture toolbar in future, return to this key and change the value of my MyPics_Hoverbar to 0).


How To Use Device Manager to verify hardware is installed OK

Description:
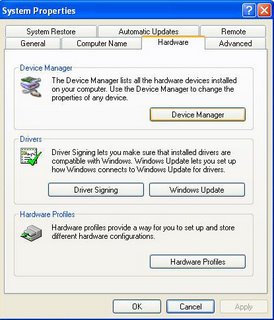
Whenever you suspect a hardware fault, it is always worth checking it is correctly installed and configured by looking in the Device Manager.


  1. right click on My Computer on the desktop or in the Start Menu.
  2. click on Properties at the bottom.
  3. click the Hardware Tab.
  4. click on Device Manager button.
  5. in the window that now opens, look for any yellow flags. These indicate a problem.
  6. what you do from now on depends on the problem. But you can double click the offending item and see whether it is installed or not, or see if the Device driver is present etc. You will be given further instructions in the reply to your specific problem.


Saturday, July 22, 2006

How To Uninstall Programs manually if not appearing in Add/Remove

Description:
It sometimes happens that you want to remove an application but it doesn't appear in the normal Add/Remove listing.
When you run across one of these situations the items listed below will help in getting rid of the application. Be aware that these steps may not remove everything associated with the application and can impact other applications on the computer. Have a backup or restore point and use caution.

Open task manager and check that none of the processes for the application are running (and if they are end them)

Find the directory for the application and delete all the files in the directory. Delete the directory.

Open regedit and navigate to HKEY_LOCAL_MACHINE\SOFTWARE and find the folder for the application. Delete the folder.

Open regedit and navigate to HKEY_CURRENT_USER\SOFTWARE and find the folder for the application. Delete the folder.

To remove the application entry from Add/Remove Programs (if present) open regedit and navigate to HKEY_LOCAL_MACHINE\SOFTWAREMicrosoftWindowsCurrentVersion\Uninstall and find the folder for the application. Delete the folder.

Some applications have Services attached to them. If this is the case, navigate to HKEY_LOCAL_MACHINE\System\CurrentControlSet\Services, locate and delete the service.

In Windows Explorer, navigate to the individual user settings and delete program references. Common places to check would be:


C:\Documents and Settings\All Users\Start Menu\Programs and delete relevant
entries.

C:\Documents and Settings\All Users\Start Menu\Programs\Startup and delete
relevant entries.

C:\Documents and Settings\%YourUserID%\Start Menu\Programs and delete
relevant entries. [Do this for each User ID listed]

C:\Documents and Settings\%YourUserID%\Start Menu\Programs\Startup and
delete relevant entries. [Do this for each User ID listed]

If no entries were found in the previous step and the application launches automatically, navigate to HKEY_CURRENT_USER\Software\Microsoft\Windows NT\CurrentVersion\Windows and delete the entry.


How To Export a registry key to a 'Hive File'

Description:
Caution when using any Registry hacks as incorrectly editing the registry may severely damage your system. Before making any changes to the registry, you should back up any valued data on your computer.

Follow below step to back up your valued data:

  1. Open Registry Editor
  2. Select the key you want to save as a file
  3. On the file menu, click 'Export'
  4. In the Export Registry File dialogue box. in Save in, click the drive, folder or network computer and folder where you want to save the hive.
  5. In File name, enter a name for the hive
  6. In Save as type, click Registry Hive Files. Click save.

How To Adjust Time Outs

Description:
The two most important things to know about Registry Editor are that it copies your changes immediately into the registry and that it has no Undo Command. The Registry Editor doesn't wait for you to issue a File, Save command it has no such command before making changes permanent. And after you have altered some bit of registry data, the former data is gone forever, unless you remember it and restore it yourself.Registry Editor is therefore a tool to be used sparingly and soberly and not to be left open when not in use.

There are a few things related to shutting down your system faster located in HKEY_CURRENT_USER\Control Panel\Desktop:


  1. AutoEndTasks (set to 1) will automatically kill hung up programs for you.
  2. The next one is HungAppTimeout (set it to 1000).
    NOTE: Be careful when you adjust this setting: If you use a program that runs slowly on XP, the OS might falsely determine that it has hung. In such a case, you can increase the HungAppTimeout value by increments of 1000 until the false "hung" detections stop.
  3. Next up is WaitToKillAppTimeout. Which should be set to 4000 (default is 20000).
  4. Since we have the programs being killed after a certain amount of time you will also want to do the same for services. Change the WaitToKillServiceTimeout to 4000 as well.
  5. Always backup the Registry before making any changes

Friday, July 21, 2006

How To Detecting programs with hidden Internet Access

Description:
Detecting programs with hidden Internet Access

If you are experiencing problems with your computer unexpectedly connecting to the internet, you can find out which of your installed programs have an internet feature that might be causing this.If you want to check which of the programs on your PC have a hidden link, follow these steps.

Follow below step:


  1. Click start > Run
  2. Type cmd. Press Enter or click okay)
  3. In the MS-DOS window that opens type netstat -a for XP home edition (for XP Pro users type netstat -ao) and press enter. this will display a list of all current TCP / IP connections
  4. Make a note of the process Identification Numbers (PIDs).These will allow you to locate which programs have a connection to the internet
  5. Open the Task Manager, by pressing Ctrl + Alt + Delete, or right click your taskbar and click Task Manager
  6. Click on the processes tab. In the PID column look for the PID numbers you noted down.You can now instantly see which programs have an internet connection.If you cannot see the PID column, click View > Select Columns and activate the PID column by checking it. Click OK to return to the main Task Manager screen. The PID column should now be visible


How to Delete System Restore Points


Tips 1:
How to disable System Restore when advised after a Virus or Trojan infection


  1. Click Start
  2. Right-click on the My Computer icon, and then click Properties
  3. Click the "System Restore" tab
  4. Check "Turn off system restore" or "Turn off system restore on all drives"
  5. Click Apply. The following message appears"You have chosen to turn off System Restore.
    If you continue, all existing restore points will be deleted, and you will not be able to track or undo changes to your computer.Do you want to turn off System Restore?" Yes / No
  6. As noted in the message, this will delete all existing restore points. Click Yes to do this.
  7. Click OK

Tips 2:
How to Enable Windows XP System Restore after Virus/Trojan has been removed

  1. Click Start
  2. Right-click on My Computer and then click Properties
  3. Right-click on My Computer and then click Properties.
  4. Click the "System Restore" tab.
  5. Uncheck "Turn off system restore" or "Turn off system restore on all drives."
  6. Click Apply, and then click OK.

How to delete an undeletable file

Description:

This tip will teach you how to delete a undeletable file in your computer.

Tips:
  1. Click START and in RUN enter CMD and press Enter
  2. Now press Control-Alt-Delete to bring up Task Manager
  3. Click on the Processes tab
  4. Find 'explorer.exe' in the lefthand column
  5. Right click on it and select end process
  6. Your desktop will now dissapear except for the command window you opened earlier
  7. Using this command window and DOS commands, navigate to the folder containing the file you wish to remove and delete it.
  8. Commands to use include "CD\" to move to the root folder.
  9. Then "CD\foldername\foldername" to move forward to a named directory.
  10. Then "DEL filename" to remove the file ensuring that you use the full filename including the extension. eg del filename.exe or del filename.jpg
  11. Press Control-Alt-Delete once more
  12. Click on FILE and select New Task
  13. Enter 'explorer.exe' and press enter.
  14. The desktop will reappear.

Tuesday, July 11, 2006

How to Changing Drive Letters

Description:

Change Drive Letters in Windows XP

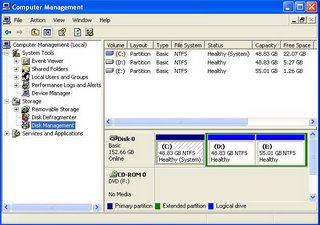
When you add drives to your computer, such as an extra hard drive, a CD drive, or a storage device that corresponds to a drive, Windows automatically assigns letters to the drives. However, this assignment might not suit your system; for example, you might have mapped a network drive to the same letter that Windows assigns to a new drive. When you want to change drive letters, follow these steps:

1. Right-click My Computer, and then click Manage. It will appear a computer management box like below.


2. Under Computer Management, click Disk Management. In the right pane, you'll see your drives listed. CD-ROM drives are listed at the bottom of the pane.

3. Right-click the drive or device you want to change, and then click Change Drive Letter and Paths.


4. Click Change


5. Click Assign the following drive letter


6. Click the drive letter you want to assign and then click OK.

Notes:

You will not be able to change the boot or system drive letter in this manner. Many MS-DOS-based and Windows-based programs make references to a specific drive letter (for example, environment variables). If you modify the drive letter, these programs may not function correctly.

How to change the font size in my browser

Descriptions:

Below is additional information and help with changing the font type and size in each of the major browsers; Find the browser you're using that i list below. Keep in mind that some web pages are designed to work with specific fonts or font types, and that changing the default browser font may cause the web page not to function or display properly.

Tips:

If you have a mouse with a wheel ( example mouse above ) and are using any of the below browsers, you can quickly and easily increase and decrease the size of your fonts in your browser by holding down the Ctrl key, and while continuing to hold down the key, move the mouse wheel up or down.


Internet Explorer users

To increase, decrease, or change the default font in Microsoft Internet Explorer, follow the below steps.

=> Open Microsoft Internet Explorer.
=> Click Tools.
=> Click Internet Options.
=> Within the Internet Options window, click the Fonts button at the bottom of the General tab.
=>Within the fonts window you can adjust the default font used in Internet Explorer. If you need additional font options, you can adjust how fonts are used by clicking the Accessibility button in the General tab.

Note: Microsoft Internet Explorer also supports the tip mentioned at the beginning of this document.


Mozilla Firefox users

To increase, decrease, or change the default font in Mozilla Firefox, follow the below steps.

=> Open Mozilla Firefox.
=> Click Tools.
=> Click Options.
=> Within the Options window, click the Content button.
=> Within the content section you will be able to specify the default font type as well as the font size. In addition to being able to change these two settings, you can also click the Advanced button and get many more settings, such as the resolution and the minimum font size to use.

Note: Mozilla Firefox also supports the tip mentioned at the beginning of this document.


Netscape users

=> Open Netscape.
=> Click Tools.
=> Click Options.
=> Within the Options window, click the Fonts & Colors button.
=> Once within the Fonts & Colors window you can adjust the different types of fonts including, the colors, resolution, and minimum font size.

Note: Netscape also supports the tip mentioned at the beginning of this document.


Opera users

=> Open Opera.
=> Click Tools.
=> Click Preferences.
=> Within the Preferences window, click the Web pages tab.
=> Once in the Web pages tab you will be able to adjust the type of fonts used. If you need more settings to adjust your fonts or font size, click the Advanced tab and click the Fonts option for several dozen additional changes that can be made to the fonts.

Note: Opera also supports the tip mentioned at the beginning of this document.

How To Making your web browser more accessible

Description:

How to make the text larger in your web browser, without using any special software.

Note:

If you find that this does not magnify the text enough to be useful, then it is worth investigating screen magnification software.


Microsoft Internet Explorer 5.0, 5.5, and 6.0

=> Open your internet explorer web browser
=> Choose the drop down menu at the top of the window of the browser marked “view”
=> A list of options will appear in the drop down menu, choose “text size”
=> Next another drop down menu should appear with options including “small”, “medium”, “large”, “largest”
=> Select “largest”
.


Netscape 4.6

=> Open your Netscape web browser
=> Choose the drop down menu at the top of the window marked “edit”
=> A list of options will appear in the drop down menu, select “preferences”
=> This will open a large window
=> In a box on the left hand side of this window you will find a list of choices. At the top of this box you will see the word “appearance” and under that “fonts and colours

=> Select “fonts”
=> Another window will appear called “fonts” and under it will be several boxes
=> In the box will be the text “for the encoding” and a drop down box. In this box it will read “western”

=> Underneath this there will be the text “variable width font” and a drop down box. Select the box and a drop down menu should appear. Now choose “Arial”

=> In the box next to this there is the text “size”. Choose the drop down box and select “18”
=> Underneath this there will be the text “fixed width font” and a drop down box. This should already be set by default to “Courier New”

=> In the box next to this there is the text “size”. Choose the drop down box and select “18
=> Underneath these boxes there is the text “Sometimes a document will produce its own fonts”

=> Beneath this there are three choices. The top choice is “Use my default fonts overriding document specified fonts”

=> Choose this option by selecting the circle next to this sentence
=> Now select “OK”
=> The text should now appear larger in the window of your browser.


Netscape 6.2, 7.0 and 8.1

=> Open your Netscape browser
=>
Hold down the Ctrl button on your keyboard and press the plus (+) key
=>
You will find that this will enlarge the text, to enlarge again repeat the procedure
=>
Keep repeating until the text is enlarged to your requirements
=>
If you need to make the text smaller press ctrl on your keyboard and the minus ( - ) key


Mozilla Firefox 1.5

=> Open your Firefox browser
=>
Hold down the Ctrl button on your keyboard and press the plus (+) key
=>
You will find that this will enlarge the text, to enlarge again repeat the procedure
=>
Keep repeating until the text is enlarged to your requirements
=>
If you need to make the text smaller press ctrl on your keyboard and the minus ( - ) key


Apple Safari 1.2 and 2.0

=> Open your Apple Safari browser
=>
Hold down the Apple Key and press the (+) key
=>
You will find that this will enlarge the text, to enlarge again repeat the procedure
=>
Keep repeating until the text is enlarged to your requirements
=>
If you need to make the text smaller press the Apple Key on your keyboard and press the (-) key

Sunday, July 09, 2006

How to print part of a document/web page

Description:

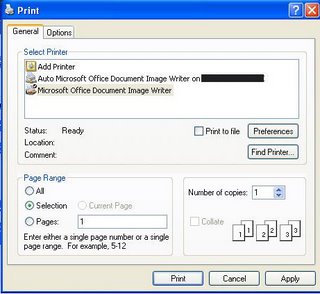
If you only need a small part of a document/webpage, instead of printing a whole document/web page, this tip will tell you how to print only what you want. Follow step below:

1. Highlight the part of the document/web page you want to print.

2. Click File, then Print

3. Under 'Page Range', instead of selecting 'All', choose 'selection'


4. Now only the highlighted part of the document/web page will be printed.

How to Using Window Run Commands

Description:

Want to learn run commads?
So goto Start > open Run and type in the commands that i show below.


Enjoy yourself and learn something new ( i think for me.)


Windows Environment Commands


=> %ALLUSERSPROFILE% -Open the All User's Profile
=> %HomeDrive% -Opens your home drive e.g. C:\
=> %UserProfile% -Opens you User's Profile
=> %temp% Opens -temporary file Folder
=> %systemroot% -Opens Windows folder


Management Consoles

=> certmgr.msc --Certificate Manager
=> ciadv.msc --Indexing Service
=> compmgmt.msc --Computer management
=> devmgmt.msc --Device Manager
=> dfrg.msc --Defragment
=> diskmgmt.msc --Disk Management
=> fsmgmt.msc --Folder Sharing Management
=> eventvwr.msc --Event Viewer
=> gpedit.msc --Group Policy -XP Pro only
=> iis.msc --Internet Information Services
=> lusrmgr.msc --Local Users and Groups
=> mscorcfg.msc --Net configurations
=> ntmsmgr.msc --Removable Storage
=> perfmon.msc --Performance Manager
=> secpol.msc --Local Security Policy
=> services.msc --System Services
=> wmimgmt.msc --Windows Management


Shortcuts

=> access.cpl --Accessibility Options
=> hdwwiz.cpl --Add New Hardware Wizard
=> appwiz.cpl --Add/Remove Programs
=> timedate.cpl --Date and Time Properties
=> desk.cpl --Display Properties
=> inetcpl.cpl --Internet Properties
=> joy.cpl --Joystick Properties
=> main.cpl keboard --Keyboard Properties
=> main.cpl --Mouse Properties
=> ncpa.cpl --Network Connections
=> ncpl.cpl --Network Properties
=> telephon.cpl --Phone and Modem options
=> powercfg.cpl --Power Management
=> intl.cpl --Regional settings
=> mmsys.cpl sounds --Sound Properties
=> mmsys.cpl --Sounds and Audio Device Properties
=> sysdm.cpl --System Properties
=> nusrmgr.cpl --User settings
=> firewall.cpl --Firewall Settings (sp2)
=> wscui.cpl --Security Center (sp2)


Run Commands

=> Calc --Calculator
=> Cfgwiz32 --ISDN Configuration Wizard
=> Charmap --Character Map
=> Chkdisk --Repair damaged files
=> Cleanmgr --Cleans up hard drives
=> Clipbrd --Windows Clipboard viewer
=> Cmd --Opens a new Command Window (cmd.exe)
=> Control --Displays Control Panel
=> Dcomcnfg --DCOM user security
=> Debug --Assembly language programming tool
=> Defrag --Defragmentation tool
=> Drwatson --Records programs crash & snapshots
=> Dxdiag --DirectX Diagnostic Utility
=> Explorer --Windows Explorer
=> Fontview --Graphical font viewer
=> Ftp -ftp.exe program
=> Hostname --Returns Computer's name
=> Ipconfig --Displays IP configuration for all network adapters
=> Jview --Microsoft Command-line Loader for Java classes
=> MMC --Microsoft Management Console
=> Msconfig --Configuration to edit startup files
=> Msinfo32 --Microsoft System Information Utility
=> Nbtstat --Displays stats and current connections using NetBios over TCP/IP
=> Netstat --Displays all active network connections
=> Nslookup--Returns your local DNS server
=> Ping --Sends data to a specified host/IP
=> Regedit --Registry Editor
=> Regsvr32 --Register/de-register DLL/OCX/ActiveX
=> Regwiz -Registration wizard
=> Sfc /scannow --System File Checker
=> Sndrec32 --Sound Recorder
=> Sndvol32 --Volume control for soundcard
=> Sysedit --Edit system startup files (config.sys, autoexec.bat, win.ini, etc.)
=> Taskmgr --Task manager
=> Telnet --Telnet program
=> Tracert --Traces and displays all paths required to reach an internet host
=> Winipcfg --Displays IP configuration
=> Wupdmgr --Takes you to Microsoft Windows Update

How To Defragment Your Hard Drive

Turn off Hibernation Feature before you use Disk Defragmenter

Description:


If you use the Windows XP's Hibernation feature on your laptop or PC, you may want to delete the Hiberfil.sys file from the hard disk before defragmenting. When you put your computer in hibernation, Windows XP writes all memory content to the Hiberfil.sys file before shutting down the system. Then, when you turn your computer back on, the OS uses the Hiberfil.sys file to put everything back into memory, and the computer resumes where it left off. However, Windows XP leaves the Hiberfil.sys file on the hard disk, even though it's no longer needed.

The Hiberfil.sys file, which can be very large, is a special system file that Disk Defragmenter cannot defragment. Therefore, the presence of the Hiberfil.sys file will prevent Disk Defragmenter from performing a thorough defragmenting operation.

Follow these steps to remove the Hiberfil.sys file from the hard disk:
1. Goto Start > Control Panel and double-click Power Options.

2. Select the Hibernate tab in the Power Options Properties dialog box.

3. Clear the Enable Hibernation check box and click OK.

Notes:

As soon as you clear the check box, Windows XP automatically deletes the Hiberfil.sys file from the hard disk. Once you complete the defrag operation, you can re-enable the Hibernation feature.

How to Create a Password Recovery Disk

Description:


If you have a password set up on your computer it’s a good idea to make a password recovery disk just in case you forget your password. The Forgotten Password Wizard allows you to create a password recovery disk that can be used to gain access to your account on your PC in the event of you forgetting your original password.
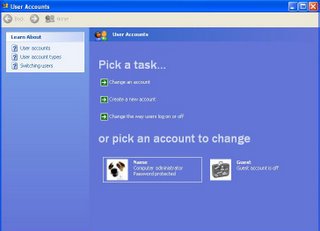
1. Click Start > Control Panel
2. Double Click the User Account icon

3. Click the account name you want to create the password reset disk for.

For me i choose Name for example.

4. In the left-hand column click on the ‘prevent a forgotten password’ link

5. The Forgotten Password Wizard will start. Step through each of the screens in turn and insert the floppy disk when requested to do so.

To test the new password recovery disk, follow these steps:

Re-boot your PC.
Enter an incorrect password and press enter.
The Windows help balloon will open and ask you if you have a forgotten password.
Click the link ‘use your password reset disk’ in the help balloon.
You will be asked to insert the password reset disk if you haven’t done this already.The password reset Wizard will start again. Enter a new password and click next.
Your new password will be saved onto the floppy disk and also made your new Windows logon password.
Windows should now continue to load as normal

Friday, July 07, 2006

How To Change Your Start Menu Speed

1. Goto Start > Run > type regedit

2. Open HKEY_CURRENT_USER > Control Panel > Desktop

3. Find MenushowDelay and double click it to change the value data to 0.

Finally, restart your computer and see the changes of your start menu.

How To Set Auto-Shutdown for Your Window

1. Goto Start > Run.

2. Type Shutdown.exe -s -t xx

xx here mean time in second.Example if xx = 120, that mean your window will automatic shutdown in 2 minute.
If you want your computer shutdown after 30 minute so type Shutdown.exe -s -t 1800


If your want cancel this auto shutdown:

a.) Goto Start > Run

b.) Type in shutdown.exe -a to remove the auto shutdown.


How To Lock Your Desktop

Here have two ways to lock your XP desktop:


1. Hold down the Windows key and the L key (WinKey+L) simultaniously.

2. You can also create a shortcut icon on your desktop using the command: rundll32.exe user32.dll,LockWorkStation

->Right-click somewhere on the desktop
-> Select New Shortcut and type:

rundll32.exeuser32.dll,LockWorkStation

How To Change Window Maximize and Minimize Speed

Everytime when we maximize and minimize our window, we will find that time for system to maximize and minimize window will be slow. So now, I will teach you all how to change your windows maximize and minimize speed. Follow below steps:


1. Goto Start > Run > type regedit.


2. Goto HKEY_CURRENT_USER > Control Panel >

Desktop >WindowsMetrics


3. Find MinAnimate and double click to change the value data to 0.


4. Restart your computer.

Now you can see what the different after you restart your pc.Try maximize and minimize your window.


Thanks for viewing my tutorial.

How To Make Your Window XP Start More Faster 2

Click Picture to see more clear

1. Goto Start > Run > type regedit.

2. Open HKEY_LOCAL_MACHINE > System > CurrentControlSet > Control > SessionManagement > PrefetchParameters.

3. Inside the right box and choose EnablePrefetcher.

4. Double click and change the value data to 0.

Info: If your computer CPU is more than Plll 800Mhz, your can try to change the value data to 4 or 5. If not, the default value is 3.

How To Disable Balloons

Click on picture to view more clear.

1. Right click on Start and select Properties.

2. At Start Menu choose Customize...

3. Select Advanced tab and Uncheck the box labeled Highlight Newly Installed Programs.

4. Click OK.

More About Disable Balloons